This document provides for the establishment and maintenance of a table of name and address records for use in mail merge, form letter, and bulk email operations.
Select a previously created key, or type in a new key to create one.
Populate the table by selections in the left Name Address column. Or, place a tick in All Debtors, All Creditors, etc, then click 'Populate' from the ribbon.
Check the box between Name Address and Name to activate a selection for email. Use the Select All check box to select all.
Optional
Use the Batch Size to control the maximum number of letters or faxes to be generated in a single run. The Merge Count field keeps track of how many have been sent. If the Merge Count is non-zero then merging will (re)-commence from that point.
Optional
A tick in Erase All will cause all entries to be deleted at the start of the Populate function. Clear this check box if you want to combine various groups one after another.
Optional
Use these fields to select name and address records to be included in this mailing list when the Populate button is pressed.
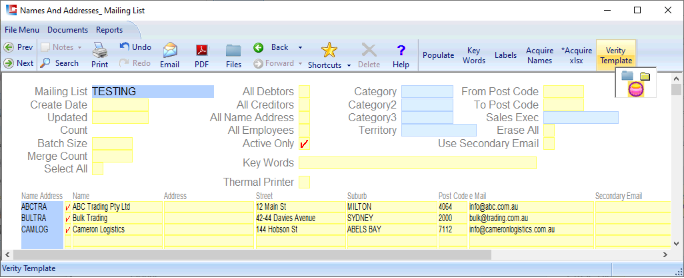
Opening the Mail Out Window
A test example is provided below. To open a mailout window, click the 'Verity Template' button highlighted in the ribbon below. This will present 3 icons.
1. Blue Folder and Windows Explorer Folder
The Blue folder and Windows Explorer folder, each allow the user to select a verity file that will present in the HTML body of the mailout.
Any *****.verity file can contain a selection of tag substitution the Name and Address Document, in followed by images and or text.
2. Verity (red) Icon
The Verity icon will open the mail window, using the verity file from step 1 as the body of the email. Futher attachments can be appended in the mail out window.
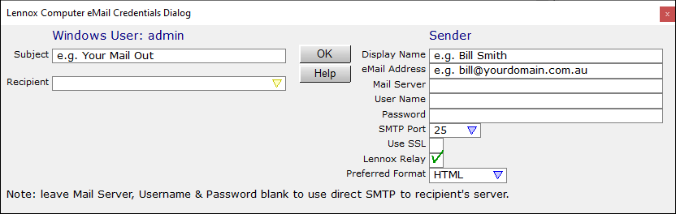
Mailing List - Mail Out Window - Setting Credentials
Page 2 Mail Out
1. Lennox Relay - tick box provided for ease of use The Credentials settings in this example are a guide to the use of Lennox Relay (ticked below), meaning that there is no need to include the users Mail Server settings and Password.
To use or trial the Lennox Relay, populate the Credentials window in the same manner as below, substituting your own Subject, Display Name, eMail Address as appropriate.
2. Non Lennox Relay If not using the Lennox Relay (blanked), the fields (Mail Server, Username, Password, SMPT Port, Use SSL), need to be configured according to the Users email settings.
1. Lennox Relay
Right mouse click here to browse and select attachments.
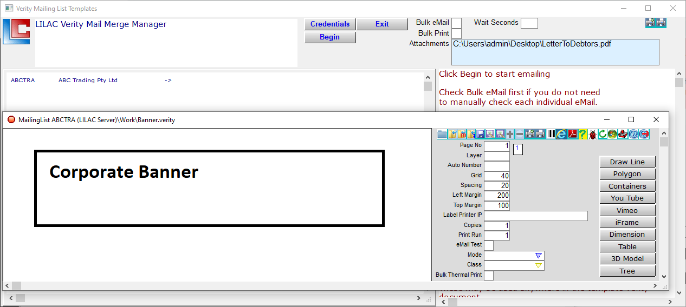
Mailing List - Mail Out Window - Send eMails
Page 3 Mail Out
With Credential Set, the mail out can be processed: 1. Send each eMail individually; or, 2. Bulk (send) eMail.
1. Send each eMail individually
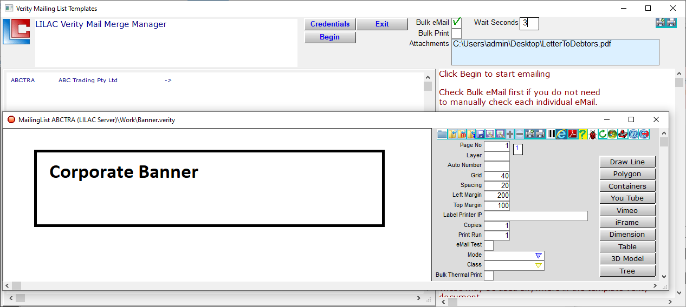
Begin: Presents the selected verity document, in this example, Banner.verity
Press the email (@) send arrow to cycle through and send emails manually.
2. Bulk (send) eMail. Enter 3 in the 'Wait Seconds' field.
Begin, ***Bulk eMail + Wait Seconds*** ticked :
Automates the sending of emails, cycling through the mailing list until complete.
Wait Second = 3 provides the email server time to send, reducing the likelihood of overload.
'All done', close the Mailout Window.
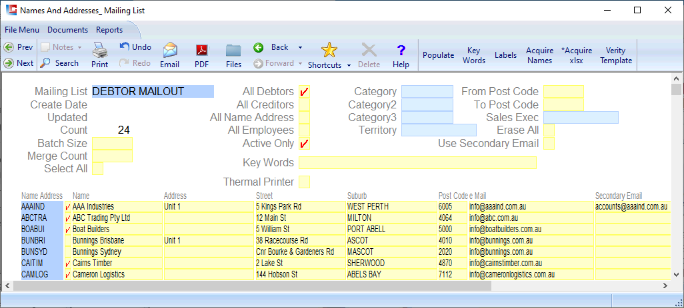
Mailing List
Page 4 Mailing List
Purpose: A Mailing List is a document which brings together a set of Name & Address records which you wish to use together for prospecting & mail purposes.
Context: This page is split into two separate sections. The header contains the fields to help you mass populate (or mass depopulate) the mailing list. Below this, are fields that allow separate entities in the LILAC database to be added to the mailing list.
Start by typing in the Mailing List Key. Then select if you want all debtors, all creditors or all name and address records in the mailing list. After this, then press the Populate button.
For example place a check next to All Creditors and select a category such as TRADE. The Populate button will then search through the Creditors database and select TRADE category accounts and add them to the Mailing List.
Depending on the options you selected the mailing list will be created. From here, go through and add in or remove any specific entities.
Modifying the Name and Address record on this screen will automatically update the Name and Address record stored in the LILAC database.
Mailing List: Enter the name key you wish to use for a particular list used for organising and retrieving the list from the database. Create Date: Enter the date that the mailing list was created on. Updated: Enter the date that the mailing list was modified on. All Debtors: Tick this check box, if you wish to add in all the debtors to the mailing list. All Creditors: Tick this check box, if you wish to add in all the creditors to the mailing list. All Name Address: Tick this check box, if you wish to add in all the name and address's to the mailing list. Erase All: Tick this check box, if you wish to remove in all the entries from the mailing list. Category: Restrict the entries added by selecting the category. This field applies to debtors, creditors and name and address records. Category2: Restrict the entries added by selecting the secondary category. This category only applies to Debtors. Category3: Restrict the entries added by selecting the tertiary category. This category only applies to Debtors.
Name Address: The Name and Address key of the entity in the mailing list. This field can not be changed after clicking the Populate button, but additional records be added, or existing fields can be deleted, by clearing this field (moving the caret to the beginning of the field and pressing the space bar). Name: The name of the entity. This field is generated by clicking the Populate button. This field can be changed. Address, Street, Suburb, Post Code: The address of the entity. These fields are generated by clicking the Populate button. These fields can be changed.
Transaction Processing Button Description: Populate: Clicking the Populate button adds entries to the mailing list that match the parameters specified. From Here: Run a Mailing List Labels or a Mailing List CSV report for printing out a copy of the mailing list.